Photography Tips - Creative control through manual camera settings
If you have a new digital camera and want to step beyond the auto setting mode and take more creative control this post might interest you.
Yesterday I met with a couple of people interested in improving their photography by learning more about how to set up their camera to ensure good colour, focus and exposure.
I made these notes about our discussions on a starting point for exploring more manual control for creative purposes.
Photography Tips - Creative control through manual camera settings
1. ISO - set ISO to the highest value possible without generating too much noise - this varies from camera to camera - for a Canon S2 IS it would be 200, for a Rebel XT - 800 or possibly 1600.
2. Metering - set metering to evaluative so that the camera looks at the whole scene, just as your eye does, when calculating exposure. Later you can try the advanced metering modes - centre weighted and spot.
3. Focusing - set the camera to focus on a central box. When composing your shot focus on the subject of interest and while still holding the shutter button down half way recompose the view and finish taking the shot.
4. Creative mode setting - set camera to Aperture Priority, Av, and select f8 as the aperture. This will ensure a good depth of field of focus as all zoom lengths.
5. White Balance - set to Auto White Balance, AWB, unless you're taking shots e.g. indoors with incandescent lights, then select tungsten.
Using these settings when you press the shutter halfway the camera calculates the focus point (the middle box) and the shutter speed necessary to capture the image.
The shutter speed which the camera has calculated is displayed on your viewfinder.
At this point you must decide if the shutter speed is appropriate for the subject matter.
And how do you tell that? Well, first, if you're hand holding the camera you'll want to steady it as much as possible to avoid camera shake which results in blurry pics.
So one thing you can do is use the viewfinder rather than the LCD panel to compose your shot - this allows you to prop the camera against your body rather than have it dangling in the air.
Even so positioned the slowest shutter you can use is generally given to be the reciprocal of the focal length, glaze, glaze. This means when your shooting with the lens at the wide angle setting, e.g. 38mm you're slowest allowed shutter without camera shake would be 1/38th second. With the lens fully extended to, say 430mm, the slowest shutter would be 1/430th second.
A camera with IS - Image stabilization, will allow you the shoot with an even slower shutter than normally possible.
So, when you're taking your shot, you check the shutter that the camera suggests then either say yes that's OK and finish your shot or you say no - that's too slow.
If the shutter suggested is too slow you reduce your aperture from f8 to f3.4 or f2.7 realizing that while you are opening up the size of the aperture to allow more light in so you can use a slower shutter speed you are also reducing the depth of field.
The depth of field is the part of the pic which is in focus - from the point you actually focused on extending backwards a certain distance and extending in front of it a certain distance. The choice you make on aperture size determines what subject in the composition is in focus.
You then recompose the shot check that the shutter speed this time is acceptable and finish the shot.
There will be times, with certain compositions, that the exposure calculated by the camera will not be correct - too much light will get in and burn out the highlights or not enough will get in resulting in a dark snap. Your options at this point are to go to full manual mode, M, and adjust either or both of the shutter speed and aperture opening - or - stay in Av mode and use exposure compensation.
Enough! Uncle! Uncle!
One very important in camera tool you should use is the histogram. You might remember your film camera having a needle which moved or some such visual clue to tell you when the exposure was set right. That's basically what the histogram does. It's a little graph that looks like your hydro consumption bill. If everything is bunched over on the left your pic is dark (and maybe they cut your hydro off six months ago) - if the histogram crowds off the graph to the right there are likely blown highlights because the snap is overexposed. Learn to check the histogram after taking a pic - you can see right away if areas are overexposed because they flash in the thumbnail pic on the LCD.
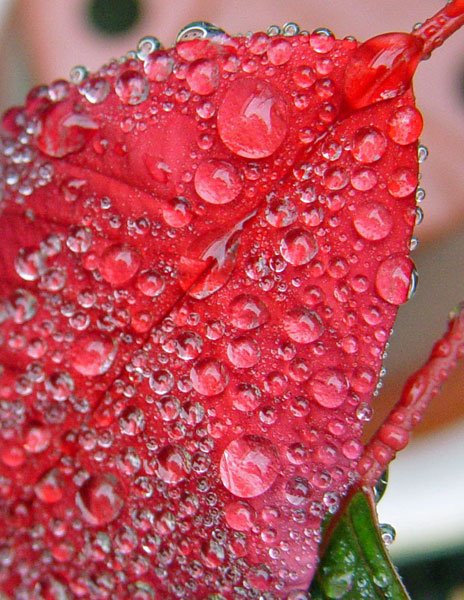
f2.2 to show narrow depth of field, Guelph


3 comments:
As one of the beneficiaries of your tips, I appreciate the reinforcement of what you taught Saturday. Hope you had fun at Doors Open Guelph!
Nice... although i would get rid of the destracting stuff in the lower right corner.
http://sergykalstudios.blogspot.com
Thanks.
Yes, I thought about that patch of green and perhaps a crop that removed the bottom quarter or so - but in the end decided to leaf it be - I saw it as a bit of contrast. Chacun son gout.
Post a Comment